When it comes to applying for passports, visas, driver’s licenses, or other official documents, one thing that can trip people up is the biometric photo. You might think, “It’s just a photo, right?” Well, not exactly. Biometric photos are precise, standardized, and play a critical role in identification. Getting it wrong can lead to delays, rejections, or even fines in some countries. Let’s dive deep into everything you need to know about biometric photos for documents.
What Are Biometric Photos?
Biometric photos are highly standardized images specifically created for official identification purposes. Unlike casual snapshots or the selfies you might take on your phone, these photos are designed to meet strict government and international guidelines. The main goal is to capture a person’s facial features in a precise, reproducible way that can be reliably used for identification. These photos are machine-readable, meaning they can be processed by facial recognition systems and other biometric verification technologies. This standardization ensures consistency across databases and reduces the risk of errors during identity verification.
What sets biometric photos apart is their level of detail and compliance. They are required to be of high resolution, with proper lighting, and feature a neutral facial expression. Any deviation—like tilting the head, wearing sunglasses, or having shadows on the face—can result in the photo being rejected. The reason for this rigidity is that these images are often used in automated systems that compare thousands of facial points. A small change in expression or angle can affect the software’s ability to correctly identify a person.
Biometric photos play a critical role in modern security and administrative processes. For governments, these photos ensure that official documents such as passports, visas, and national IDs are standardized and easily verifiable. They help prevent identity fraud, as altering or faking a compliant biometric photo is much more difficult than a casual picture. Furthermore, the compatibility of these photos with automated systems speeds up verification in airports, banks, and other institutions that rely on digital identification methods.
The applications of biometric photos go beyond passports and travel documents. They are increasingly used in driver’s licenses, employee ID cards, student IDs, and even some financial services where secure identity verification is essential. By adhering to strict guidelines, these photos help create a reliable digital identity for individuals, ensuring that both humans and machines can accurately confirm someone’s identity when needed. This makes biometric photos an indispensable tool in today’s increasingly digital and security-conscious world.
Biometric Photo Standards
| Feature | Requirement | Recommended Size | Why It Matters | Tips for Compliance |
| Photo Size | Standardized dimensions for official documents | 35×45 mm (common) | Ensures the image fits document templates and machine scanners | Measure carefully, crop exactly, avoid resizing that distorts proportions |
| Background | Plain, light-colored background, usually white/off-white | N/A | Prevents facial recognition interference, improves contrast | Use a smooth wall or professional backdrop, avoid shadows or textures |
| Facial Expression | Neutral expression, mouth closed, eyes open | N/A | Allows machines to capture consistent facial landmarks | Relax your face, avoid smiling, keep mouth closed, look directly at the camera |
| Head Position | Face centered, straight, no tilt or rotation | N/A | Ensures alignment with document templates and facial recognition systems | Use a tripod or stand to maintain straight posture, head fully visible |
| Glasses | Generally avoided, clear eyes required | N/A | Reflections or tinted lenses can obscure eyes, affecting recognition accuracy | Remove glasses if possible; if necessary, ensure no glare and eyes are fully visible |
| Headgear | Only allowed for religious purposes, must not cover face | N/A | Ensures facial features are fully visible while respecting religious requirements | Position headgear so it doesn’t block forehead, eyes, or chin |
| Photo Quality | High resolution, sharp focus, proper lighting | N/A | Prevents blurriness or pixelation that can cause rejections | Use a good camera, ensure proper lighting, avoid shadows, and check clarity |
| Lighting | Even, natural light preferred, avoid shadows/glare | N/A | Prevents dark or bright spots, ensures accurate color representation | Use diffused daylight or soft artificial light, avoid direct sunlight on face |
| Color Accuracy | Natural skin tones, no filters | N/A | Accurate representation ensures document authenticity | Adjust camera settings for neutral color balance, avoid makeup or strong shadows |
| Photo Format | JPEG or PNG, digital submission requirements | N/A | Compatible with online document portals and machine verification | Check file size limits, maintain resolution (300 dpi recommended) |
Technical Specifications
Biometric photos are not just about how you look in front of the camera—they must meet strict technical specifications to be accepted for official documents. These requirements ensure that the photo can be accurately scanned, processed, and verified by machines, as well as read clearly by human inspectors. Below is a detailed breakdown of all the technical considerations you need to know when taking or submitting a biometric photo:
- Resolution: Biometric photos must have a high resolution, typically at least 300 dpi (dots per inch). Low-resolution images can appear blurry or pixelated when printed or scanned, which can lead to document rejection.
- File Format: Digital photos should be saved in a standard format such as JPEG or PNG. These formats are widely accepted by government portals and are compatible with facial recognition software.
- File Size: The photo file size usually needs to be between 60 KB and 240 KB. Files that are too small may lose quality, while overly large files can exceed upload limits for online applications.
- Color Mode: Images should be in 24-bit color mode, providing true-to-life colors and avoiding any distortions caused by black-and-white or grayscale images.
- Lighting: Even, natural lighting is crucial. Avoid harsh shadows on the face or background, as uneven lighting can distort facial features and make recognition difficult. Soft, diffused light works best.
- Shadows: There should be no shadows falling on the face, behind the head, or on the background. Shadows can interfere with automated detection of facial points.
- Overexposure and Underexposure: Avoid extremely bright (overexposed) or dark (underexposed) areas. Proper exposure ensures that all facial details, including skin tone, eye color, and contours, are visible.
- Background Clarity: The background should be plain and light-colored, typically white or off-white. Avoid patterns, textures, or objects that could distract from the face or confuse software detection.
- Head and Facial Position: The head must be centered, looking directly at the camera, with eyes open and mouth closed. Tilted or angled heads can cause misalignment in digital recognition systems.
- Glasses and Accessories: Avoid tinted or reflective glasses. If glasses are worn, make sure eyes are clearly visible without glare. Remove hats, headphones, or anything covering the face, unless allowed for religious reasons.
- Focus and Sharpness: Ensure the image is in sharp focus. Blurry or soft images reduce the effectiveness of facial recognition algorithms and can result in rejections.
- Contrast and Brightness: Maintain proper contrast between the face and the background. Faces should not blend into the backdrop or appear too flat due to low contrast.
- Digital Cropping: Crop the photo to fit the required dimensions (usually 35×45 mm), making sure the head occupies the appropriate portion of the frame. Avoid cutting off any part of the face or including too much empty space.
How to Take the Perfect Biometric Photo
Taking a biometric photo might seem simple, but getting it right the first time can save a lot of time, stress, and potential rejection of your application. The process requires attention to detail, adherence to technical standards, and a focus on clarity and consistency. Unlike casual snapshots, biometric photos are highly scrutinized and often reviewed both by humans and automated systems. Therefore, planning and preparation are essential to ensure the photo meets all required specifications.
The first step in taking a perfect biometric photo is choosing the right background. A plain, light-colored backdrop, typically white or off-white, works best. Avoid walls with patterns, textures, or shadows, as these can interfere with facial recognition software and make the image look unprofessional. Professional photo studios often provide optimal backdrops, but with careful setup at home, it’s possible to achieve a high-quality result using natural light and a smooth wall.
Positioning and posture play a critical role in creating a compliant biometric photo. Your head should be straight and centered in the frame, with your eyes looking directly at the camera. A neutral expression with a closed mouth ensures that facial recognition points are consistent. Keep your shoulders relaxed and avoid tilting your head, leaning forward, or turning to the side. Small adjustments, like maintaining an even distance from the camera and sitting or standing at eye level, can make a significant difference in the final image quality.
Lighting, clothing, and final checks complete the process. Natural daylight is ideal for capturing accurate skin tones and preventing shadows, while avoiding direct sunlight that can cause harsh highlights. Dress in simple clothing without uniforms, patterns, or hats (unless required for religious reasons), and remove glasses if they create glare. Take multiple shots to ensure you have options, check each one for clarity, sharpness, and proper alignment, and crop the image according to your country’s exact size specifications. Following these steps carefully guarantees a professional, compliant biometric photo that meets official standards the first time.
Common Mistakes to Avoid
| Mistake | Why It’s a Problem | How It Affects Processing | Example | How to Avoid It |
| Smiling or Frowning | Alters the natural facial structure, making recognition harder | Can distort facial recognition points | Wide grin or frown | Keep a neutral expression, mouth closed, eyes open |
| Head Tilt or Angle | Misaligns key facial landmarks used by automated systems | Machines may fail to match photo with records | Leaning to the side or tilting chin | Keep head straight and centered, use a tripod if needed |
| Wearing Sunglasses | Obscures eyes, which are essential for facial mapping | Software cannot accurately detect eye positions | Tinted or reflective glasses | Remove glasses or ensure eyes are clearly visible |
| Background Clutter | Distracts from facial features and may confuse machine algorithms | Increases likelihood of rejection | Patterned wall, furniture, or shadows | Use a plain, light-colored background |
| Low Resolution / Pixelation | Blurry or pixelated photos lose detail needed for verification | Photo may be rejected or misread by automated systems | Smartphone photo without proper resolution | Use high-resolution cameras, check dpi (300+ recommended) |
| Incorrect Size / Cropping | Photo may not fit document template, cutting off key facial areas | Rejection or need for resubmission | Head too small or edges cut off | Crop photo to exact size specifications required by the authority |
| Shadows on Face or Background | Uneven lighting can hide facial features or create false contours | Interferes with background detection and machine recognition | Shadow under chin or on wall behind | Use even, natural lighting or diffused artificial light |
| Overexposure or Underexposure | Bright or dark areas reduce clarity of facial features | Can make the face difficult to distinguish | Too bright sunlight or dim indoor lighting | Adjust lighting, avoid harsh sunlight, use soft, even illumination |
| Obstructive Accessories | Hats, headphones, or scarves can hide facial points | Prevents accurate mapping of facial landmarks | Baseball cap covering forehead | Remove all accessories unless required for religious reasons |
| Inconsistent Photos | Submitting multiple photos with differences in lighting, expression, or posture | Causes confusion or additional verification steps | Passport photo vs. visa photo look very different | Take multiple photos under the same conditions, maintain consistency |
Biometric Photos and Facial Recognition Technology
Biometric photos play a crucial role in modern security and identification systems, particularly those that use facial recognition technology. These photos are not just visual representations—they are the foundation for automated systems that verify identity quickly and accurately. The following list breaks down how biometric photos interact with facial recognition technology and why precision is essential:
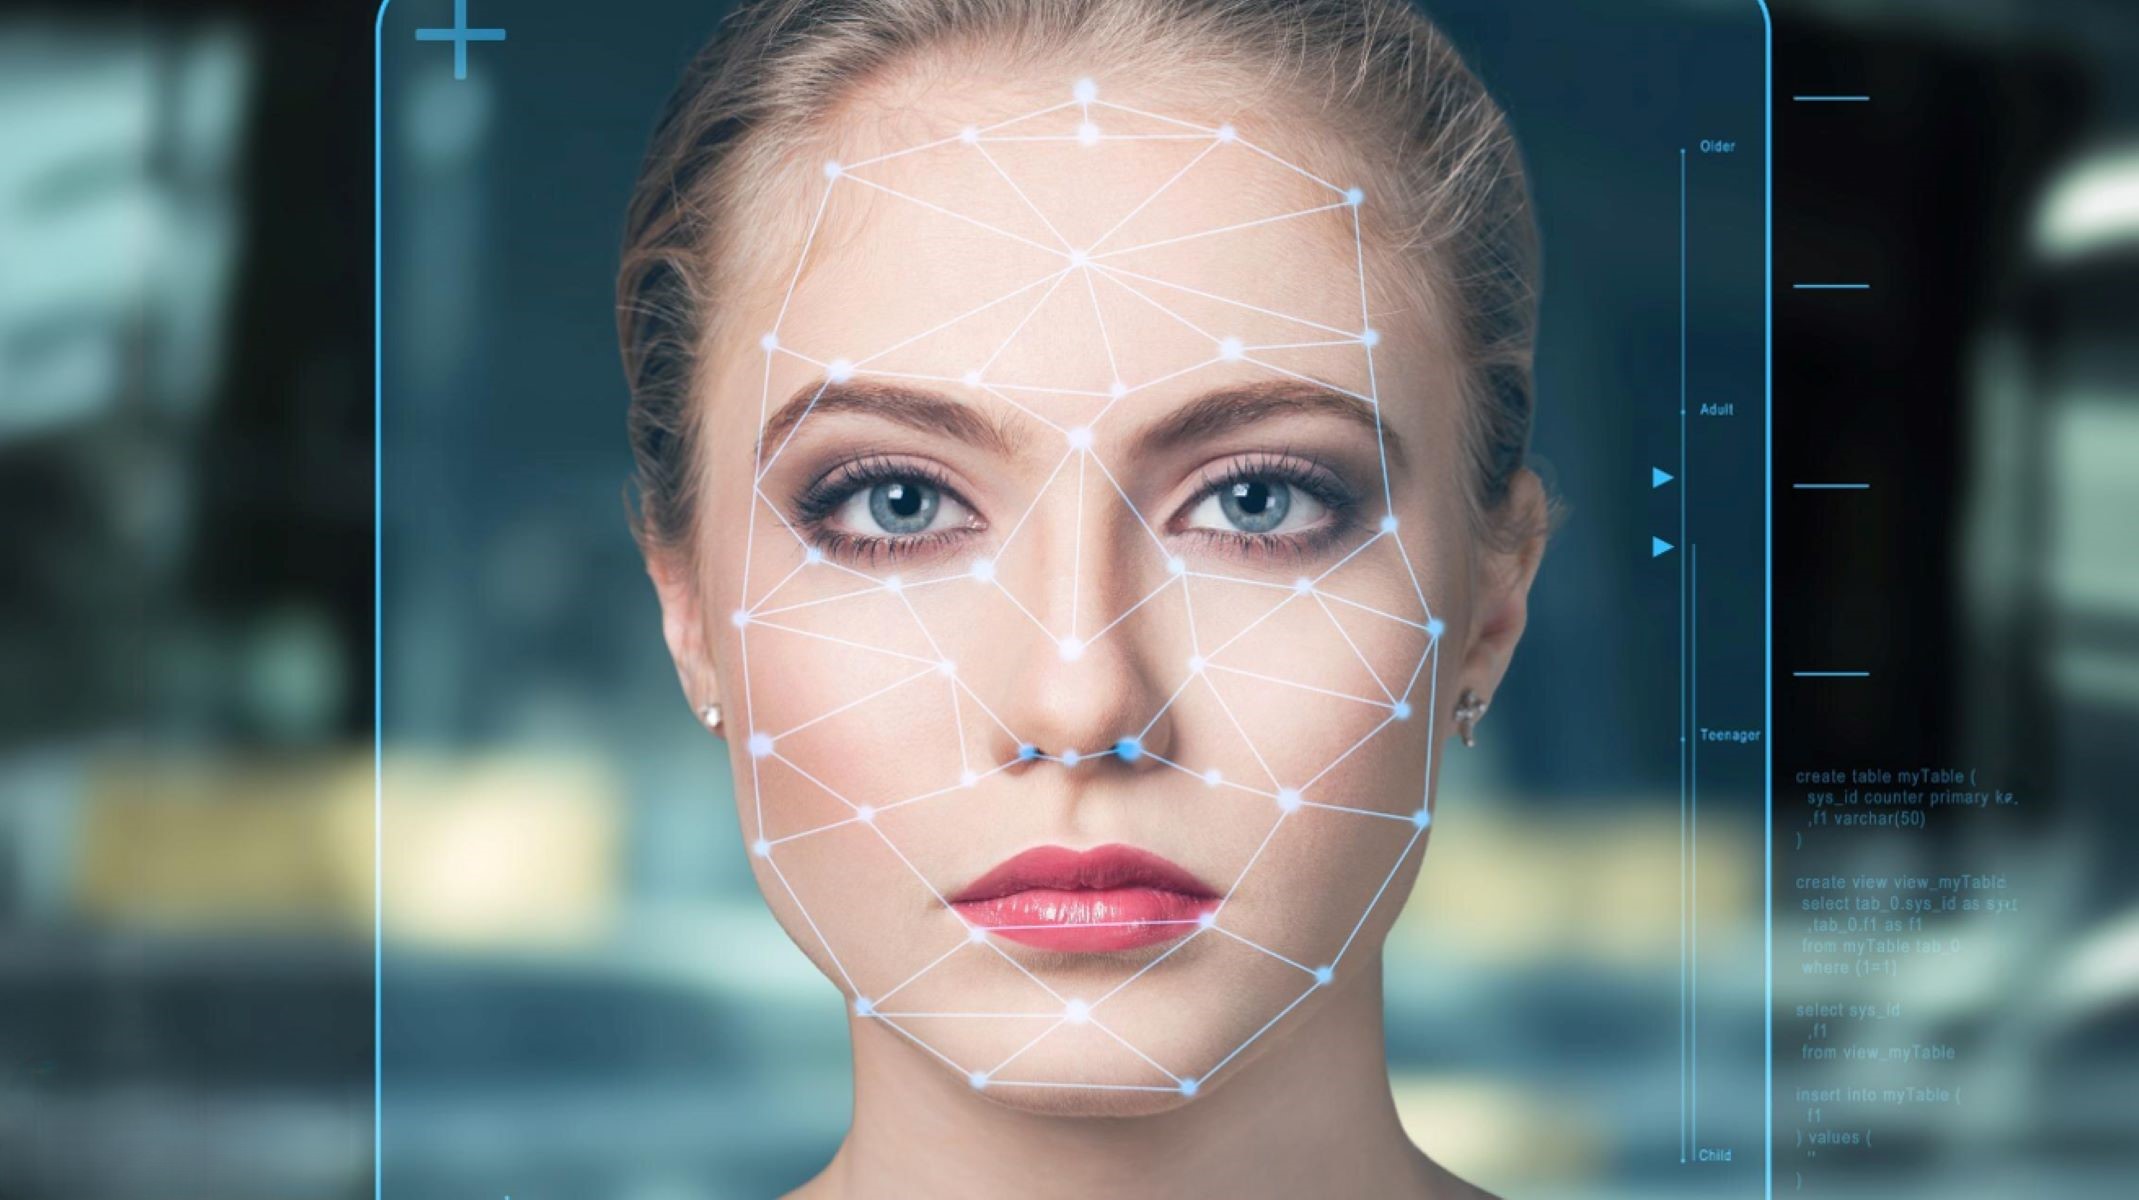
- Mapping Key Facial Points: Facial recognition software begins by analyzing the biometric photo and identifying key facial landmarks. These typically include the eyes, nose, mouth, jawline, and cheekbones. The software creates a geometric map of these features, which serves as the basis for comparison.
- Conversion to Digital Data: Once the facial points are mapped, the software converts this information into digital data. This involves creating a unique mathematical representation of your face, often called a “faceprint.” This digital blueprint captures the relative distances and angles between facial landmarks.
- Comparison with Existing Records: The faceprint generated from the biometric photo is then compared against existing databases, such as passport or visa records. The software looks for a match, verifying identity by checking if the key features align within acceptable tolerances.
- Accuracy is Crucial: Even minor deviations in head position, lighting, expression, or image quality can cause failed matches. That’s why strict guidelines exist for biometric photos, ensuring the face is captured in a neutral expression, straight-on view, and with clear lighting.
- Neutral Expressions for Consistency: A neutral facial expression is important because smiling, frowning, or tilting the head changes the relative distances between facial landmarks, potentially causing recognition errors.
- Importance of Proper Lighting: Uneven lighting or shadows can obscure critical features like the eyes, nose, or jawline. Consistent, soft lighting ensures that all facial landmarks are visible for the software.
- Avoiding Obstructions: Accessories such as sunglasses, hats, or scarves can hide important facial features. Biometric photos must keep the face fully visible to maintain accuracy in recognition.
- Resolution and Clarity: High-resolution images are necessary because facial recognition algorithms require precise data points. Blurry or pixelated photos may prevent the software from accurately mapping the face.
- Standardization Across Submissions: The software relies on consistency. Photos must adhere to standardized sizes, proportions, and background requirements to ensure they can be compared accurately with other images in the database.
- Machine and Human Verification: While machines perform the initial identification, human verification may still be required for borderline cases. A high-quality biometric photo ensures both automated and human reviewers can clearly identify the individual.
- Security and Fraud Prevention: Biometric photos, combined with facial recognition, prevent identity fraud. Altered or fake photos are easily detected, as the software looks for inconsistencies in the mapped facial structure.
- Real-World Applications: Airports, government offices, financial institutions, and border control systems all use biometric photos for secure and efficient identity verification. Each system depends on photos meeting strict standards.
- Blueprint Analogy: Think of a biometric photo as a blueprint for your face. Just as a blueprint must be accurate for a building to be constructed correctly, your photo must be precise for identity verification to succeed.